Make format the drive you wish to make Boo table (on vista and Windows 7 you will need administrative rights to complete this step)
- plug the USB device (pen-drive/Thumb drive) into any USB port on your PC.
- if windows pops up a window asking you what you want to do (auto play menu), close it
- Right click on you computer (my computer) select Manage.
- On the Computer management window click on "Disk Management" (Under Storage - if you don't see Disk management click on storage first).
- (Warning this will erase all data on the drive - so back up / copy all contents that you require to a folder in your computer) . Now from the listed drives select your USB drive then right click on it and select Format
- If the disk was only ready an active partition (boot-able) it will show you a warning select yes
- Make sure you have selected NTFS as the file system
- Press OK. A warning Screen will appear Select OK on that window too.
- The formatting process starts now.
- Wait for the formatting to complete
- If your drive doesn't say (Active, Primary Partition) that's OK as will be making it active on the next steep
- Make You USB Drive partition Active.
- Go to Start Button -> All programs -> Command Prompt
- Right Click on Command Prompt and select Run as Administrator ( The step will not work if are not running command prompt as administrator)
- on the warning screen click Yes
- on the Command prompt window type
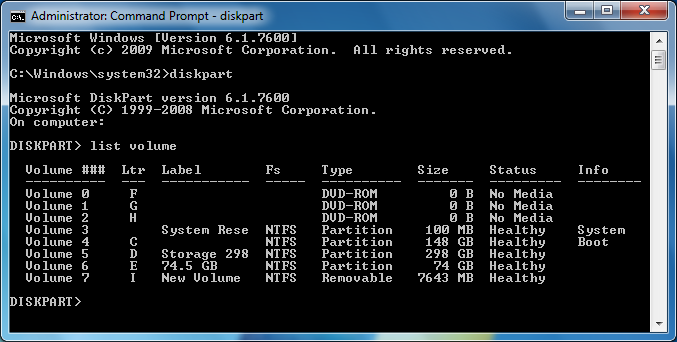
- DISKPART
- Now type
- list volume
- In my case the drive we want to modify is the Volume 7 (Size 7643 MB)
- from the list that appears make sure you note down the Volume of the drive that you want to modify
- Now type
- Select Volume 7
- For me it is Volume 7 please replace 7 wit the volume number for your USB Drive
- e.g.Select Volume 3 if your USB drive is volume number is 3
- Now to make the partition active type
- active
- close the window when it is complete.
- congratulations now you have made your drive's partition active .. wait its not over yet now you have to make it compatible with modern boot process. so continue reading.
- Make USB BOOTMGR compatible. For this step you will need a Windows vista or windows 7 DVD
- Open you DVD drive and insert your windows installation Disk into it
- Close install screen if it appears
- open Computer (My computer)
- Right click on your DVD drive and select Open
- go to boot folder
- Inside boot folder you will can see a file called bootsect or if you have file extensions visible like i do bootsect.exe
- copy bootsect to system32 folder
- Open Command prompt as Administrator again like you did before (if do not remember refer t0 step 2 sub step 1 and 2 - Do not type DISKPART or repeat any step till this )
- type
- bootsect /nt60 I:
- For me the drive's letter is I: - replace I: with your USB Drive's Letter
- for clarity i am going to replace spaces with <space> please do not type <space> you are supposed to press the space bar on your key board when you see <space>
- bootsect<space>/nt60<space>I:

- wait for it to complete
- close the windows when it is complete.
- Copy windows installer files to the USB drive ( You will need the windows installation Drive )
- Open my computer (Computer)
- right click on the windows installation drive and select open
- Make sure you will are able to see hidden files and folders


- select all files by clicking <Ctrl> button and <A> button together
- Right click on a file and select copy all the files and paste it into the USB drives Root Folder (The place where you are once you double click on the drive e.g: I:)


Right click and empty space in system32 folder and select paste (Sytem32 folder can be reached by simply pasting c:\windows\system32\ in the address bar of explorer)


Click continue - provide administrative rights if you are not working as administrator


- wait for the copying to complete
- Congratulations Now you have created a boot-able USB windows installation drive
- There is one other thing that you need to be aware of to make this work on most systems. Read on to find what it is.

4. change the bios setting of the PC on which you wish to use the USB drive to install windows
- Restart / Start your PC and press the key that takes you to your CMOS setup
- Some systems it <Del> key on your keyboard some systems it <F2> in my case its <F2>
- Once inside Bios find the boot order of your Computer
- Change it so that the system takes the USB drive as the first boot device.


- from the list select your USB drive. if you forgot to plugin plug the drive in then restart system and enter BIOS / CMOS setting by hitting <Del> or <F2>

- On most systems you can use + or - to move the selected drive up or down the list

- Save changes

Press Y or Yes on the confirmation screen restart
Now the System Should boot into your USB drive and start installation.

Please leave a comment in case of clarifications.
--------------------------------------Best Of Luck --------------------------------------
No comments:
Post a Comment
Was the post useful to u or whether u need clarification regarding what was posted.
feel free to ask new questions as well.
plese use the close this window to close this do not press the [x] button sometimes the post just doesn't appear.